Programming
What is Constrain to margin in Storyboard in Xcode 6
Have you ever wrestled with making your iOS app’s user interface look perfect across different iPhone and iPad screen sizes? Xcode’s Storyboard offers powerful tools to help, and understanding layout constraints is crucial. One particularly helpful feature is the “Constrain to margin” option. This feature in Xcode 6, and later versions, simplifies the process of creating adaptive layouts by automatically managing the spacing between your UI elements and the edges of the screen. It helps ensure that your app’s interface looks consistent and professional, regardless of the device it’s running on. By understanding and utilizing constraints to margin effectively, developers can significantly reduce the amount of time spent tweaking layouts and focus more on the core functionality of their applications. This guide will delve into the details of “Constrain to margin,” providing a comprehensive understanding of its functionality and practical application within Xcode.
Understanding Constraints in Xcode Storyboard
Constraints are the backbone of auto layout in Xcode’s Storyboard. They define the rules that govern the size and position of UI elements. Without constraints, elements would simply stay where you placed them in the Storyboard, leading to major display issues on different devices. Think of constraints as relationships between UI elements, dictating how they should interact with each other and with their parent view. These relationships are defined in terms of properties like leading, trailing, top, bottom, width, height, and aspect ratio. By properly defining these relationships, you ensure that your UI remains consistent and adapts seamlessly to various screen sizes and orientations.
Xcode provides a visual interface for creating constraints, allowing you to connect elements and define their relationships through a series of menus and options. This visual approach makes it easier to understand and manage the complex web of constraints that defines your UI. The “Constrain to margin” option is a specific type of constraint that simplifies the process of maintaining consistent spacing between your UI elements and the edges of their container, which is especially useful for creating responsive and visually appealing layouts. Auto Layout dynamically adjusts the layout of views on a screen, adapting the size and position of UI elements based on the constraints you define.
Consider a button placed near the edge of the screen. Without “Constrain to margin,” you would need to manually define constraints for the button’s leading and trailing edges, specifying the exact distance from the screen’s edge. With “Constrain to margin” enabled, Xcode automatically manages this spacing, ensuring that the button always maintains a consistent distance from the margin, regardless of the screen size. This can save significant time and effort, especially when dealing with complex layouts involving multiple elements. Constraints ensure that UI elements are displayed correctly on different screen sizes and orientations. Mastering auto layout is crucial for iOS development.
What Does “Constrain to Margin” Actually Do?
The “Constrain to margin” option in Xcode instructs the auto layout engine to create constraints that relate the edges of a UI element to the margins of its containing view, rather than directly to the edges of the view itself. Margins are pre-defined areas around the edges of a view, providing a consistent buffer zone. This creates a more visually appealing and consistent layout across different devices. By constraining to margins, you avoid having your UI elements crammed against the edges of the screen, providing a more comfortable and readable user experience. Consider this paragraph as a featured snippet candidate: When you enable “Constrain to margin,” Xcode automatically creates constraints that maintain a specified distance between the element and the margin, adapting the spacing based on the device’s screen size and orientation. This simplifies the process of creating responsive layouts and ensures that your UI elements are always positioned correctly relative to the screen’s edges.
The margins themselves are defined by the system and can vary depending on the device and orientation. For example, an iPhone might have smaller margins than an iPad, and landscape orientation might have different margins than portrait orientation. “Constrain to margin” automatically takes these variations into account, ensuring that your UI elements are always positioned appropriately. This is particularly useful when dealing with text labels or buttons that need to be easily readable and tappable. By maintaining a consistent margin, you prevent these elements from being obscured or becoming difficult to interact with. Using margins effectively improves the overall user experience.
Let’s say you have a label and a text field that you want to position side-by-side. By constraining the label’s leading edge to the leading margin of the view and the text field’s trailing edge to the trailing margin, you ensure that they are always aligned with the screen’s edges, regardless of the device. This simplifies the process of creating complex layouts and reduces the need for manual adjustments. It’s also important to note that you can customize the margins themselves if needed, providing even greater control over the appearance of your UI. Margins can be adjusted to fine-tune the layout and achieve the desired visual effect. See Apple’s documentation on Auto Layout [ Apple Auto Layout Guide ] for more details.
Practical Examples of Using “Constrain to Margin”
Imagine you’re building a settings screen for your app. You want to display a list of options, each with a label and a switch. To ensure that the labels and switches are consistently aligned with the screen’s edges, you can use “Constrain to margin.” By constraining the leading edge of the labels and the trailing edge of the switches to the margins of the cell, you create a clean and organized layout that adapts seamlessly to different screen sizes. This approach simplifies the process of creating visually appealing and user-friendly settings screens.
Another common use case is in creating navigation bars and toolbars. By constraining the elements within these bars to the margins, you can ensure that they are always positioned correctly, regardless of the device’s orientation. For example, you might constrain the leading edge of a back button to the leading margin of the navigation bar and the trailing edge of a title label to the trailing margin. This creates a consistent and professional-looking navigation bar that adapts to different screen sizes and orientations. This technique is essential for maintaining a consistent user experience across your app.
Consider a scenario where you are designing a login screen. You want to position the username and password fields in the center of the screen, with a consistent margin on either side. By constraining the leading and trailing edges of these fields to the margins of the view, you ensure that they are always centered and that they maintain a consistent distance from the screen’s edges. This creates a visually appealing and user-friendly login screen that adapts to different screen sizes. Remember to test your layouts on different devices to ensure they look as expected. Using “Constrain to margin” ensures consistent spacing in your app’s UI.
Implementing “Constrain to margin” in Xcode is a straightforward process. The following steps outline how to use this feature effectively. First, select the UI element you want to constrain. Then, open the Auto Layout menu (usually found in the bottom-right corner of the Storyboard editor). Next, choose the constraint you want to create (e.g., leading space to container margin, trailing space to container margin, top space to container margin, bottom space to container margin). Finally, ensure that the “Constrain to margin” checkbox is selected. This will create a constraint that relates the edge of the UI element to the margin of its container.
Here is a step-by-step guide:
- Select the UI element you want to constrain.
- Open the Auto Layout menu (usually located at the bottom-right of the Storyboard editor).
- Click on the “Add New Constraints” button (the triangle icon).
- Specify the desired spacing between the element and the margin.
- Ensure the “Constrain to margin” checkbox is selected.
- Click “Add Constraints” to apply the constraints.
After adding the constraints, it’s essential to test your layout on different devices and orientations to ensure that it looks as expected. You can use the Xcode simulator to test your app on a variety of devices. If you encounter any issues, you can adjust the constraints as needed to fine-tune the layout. By following these steps, you can effectively use “Constrain to margin” to create responsive and visually appealing layouts in your iOS apps. Regular testing and adjustments are crucial for achieving the desired layout. Proper constraint management is key to successful auto layout.
Frequently Asked Questions (FAQ)
- What is the difference between constraining to the container and constraining to the margin?
- Constraining to the container relates the UI element directly to the edges of its parent view, while constraining to the margin relates it to the margins of the parent view. Margins provide a built-in buffer zone, ensuring consistent spacing.
- When should I use "Constrain to margin"?
- You should use "Constrain to margin" whenever you want to maintain consistent spacing between your UI elements and the edges of their container. This is particularly useful for creating responsive layouts that adapt to different screen sizes and orientations.
- Can I customize the margins?
- Yes, you can customize the margins of a view in Xcode. This allows you to fine-tune the layout and achieve the desired visual effect. Check the Size Inspector in Xcode for margin customization options.
To maximize the effectiveness of auto layout and constraints, consider these best practices. Start with a clear understanding of your layout requirements. Before you start adding constraints, take the time to plan out how you want your UI to look on different devices and orientations. This will help you to create a more efficient and maintainable constraint system. Break down complex layouts into smaller, more manageable components. This will make it easier to understand and debug your constraints. Consider using Stack Views to simplify the layout of groups of elements. Stack Views automatically manage the layout of their subviews, reducing the need for individual constraints. For further reading, check out Ray Wenderlich’s tutorials on Auto Layout [ Ray Wenderlich Auto Layout Tutorial ].
- Prioritize content: Make sure the most important elements are easily accessible and visible on all screen sizes.
- Test thoroughly: Use the Xcode simulator to test your layout on a variety of devices and orientations.
Avoid creating conflicting constraints. Conflicting constraints can lead to unpredictable layout behavior. If you encounter constraint conflicts, use the Xcode debugger to identify and resolve them. Regularly review and refactor your constraints. As your app evolves, your layout requirements may change. It’s important to regularly review and refactor your constraints to ensure that they are still meeting your needs. Document your constraints. This will make it easier for you and others to understand and maintain your constraint system. Proper documentation is key for maintainable code. Auto Layout tools are essential for modern iOS development.
- Use Size Classes to adapt your layout to different screen sizes and orientations.
- Leverage the power of Stack Views to simplify complex layouts.
Ultimately, mastering “Constrain to margin” and auto layout in Xcode 6 and later versions is a critical skill for any iOS developer aiming to create professional, user-friendly applications. By understanding the principles of constraints and utilizing features like “Constrain to margin,” you can build UIs that adapt seamlessly to different screen sizes and orientations, ensuring a consistent and visually appealing experience for all users. This not only enhances the user experience but also saves you valuable development time by automating the layout process. For additional resources, consult the Swift documentation [ The Swift Programming Language ].
Now that you understand the power of “Constrain to margin,” go ahead and experiment with it in your own projects! Try building a simple layout using constraints and see how easily it adapts to different screen sizes. Don’t be afraid to explore the different options and settings to fine-tune your layout to perfection. With a little practice, you’ll be creating responsive and visually stunning UIs in no time. Consider exploring related topics like Size Classes and Stack Views to further enhance your Auto Layout skills. Your users (and your future self) will thank you for the effort you put into creating a polished and professional user interface.
Question & Answer :
I am Working with autolayout and constraints and found there is a Constrain to margins option in Xcode 6 which was not present in Xcode 5 and is checked by default.
I created a test project then I added a UITableView on a ViewController with the frame set to the same size as view and added constraints
Xcode 6 You can see here even though tableview has the same frame as view Xcode suggests to add -16 as constraint whereas Xcode 5 would suggest adding spacing 0.

Now when you uncheck “Constrain to margin” option it behaves same as Xcode 5 and would suggest adding 0 as constraint

Also, I found that once I add constraint with Constrain to margin checked, I am no longer able to open the storyboard file in Xcode 5 so it’s definitely something new in Xcode 6
Hopefully, I am able to explain my question properly. I would like to understand what “Constrain to margin” actually does and when I should and should not use it. I do apologize if it’s something very simple and obvious.
EDIT
I found something about layout margins in discussion here , I wonder if it’s related to this.
I don’t understand at all why people are complaining that “Margins would cause an outright crash on anything prior to iOS 8.”
Setting your constraints relative to margin in a xib file or storyboard DOES NOT make your app crash on iOS7, and it DOES NOT make a UI difference on your iOS7 device neither, as long as you don’t touch the
UIView.layoutMarginsandUIView.preservesSuperviewLayoutMarginsproperties in your code.
What is Margins in iOS8
Layout margins represent padding around the interior of a UIView that the layout system can use when laying out subviews - to ensure that a gap is left between the edge of a view and a subview. In this respect it is very much like the padding property associated with blocks in CSS.
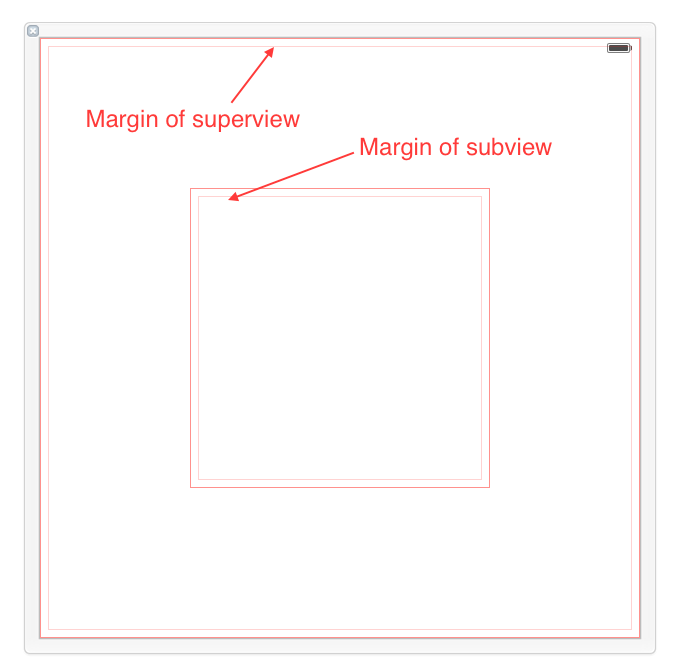
By default, a UIView has layout margins of 8 points on each side, and this can not be changed in Interface Builder. However, by setting the UIView.layoutMargins property in the code, which is only available on iOS8, you are able to adjust these values.
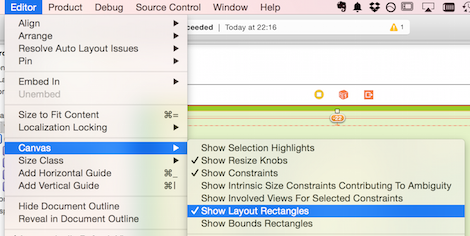
You can get IB to display the margins with Editor > Canvas > Show Layout Rectangles:
Margins can be used to help layout your views and subviews. Every UIView come with margins by default, but they only affect view placement when you set up a constraint that is related to a margin.
How to use Margins
The only way to use margins in Interface Builder is to check the Relative to margin option while configuring your constraints. This is how you direct your constraint to Use margins instead of edges when laying out my view.
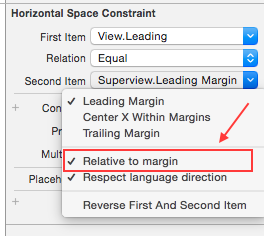
Let’s take a look at four different ways of setting up a leading constraint between a view and its subview. For each constraint we review the first association described will be the subview’s leading, and the second will be superview’s leading. What you want to pay close attention to is the check and uncheck status of the Relative to margin option of each constraint end, because that defines whether the constraint is tied to the margin or the edge of the view.
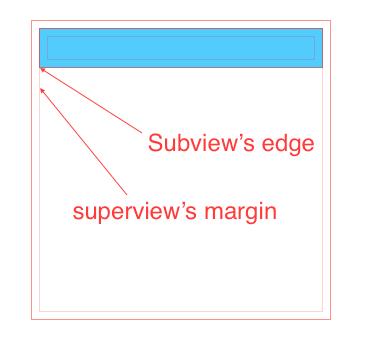
- First item(uncheck), second item(check): In this case, we’re declaring that subview’s left edge should align to superview’s left margin(as shown in this image).
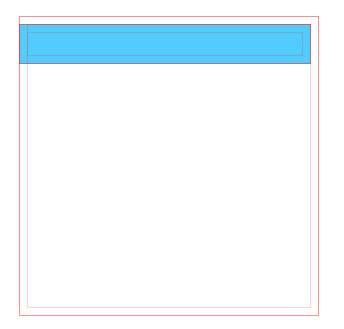
- First item(uncheck), second item(uncheck): Both using edge, not margin. In this case, we’re declaring that subview’s left edge should align to superview’s left edge.
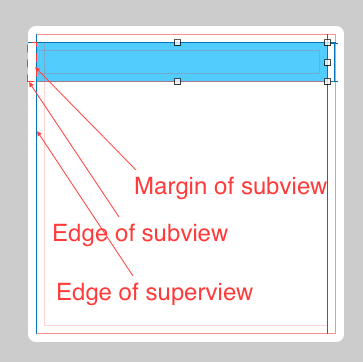
- First item(check), second item(uncheck): In this case, we’re declaring that subview’s left margin should align to superview’s left edge. This kind of layout actually makes the subview overlap the superview.
- First item(check), second item(check). This actually has a same effect as case 2, since both subview and superview has a same default margin. We’re declaring that subview’s left margin should align to superview’s left margin.
What is good about Margins
This new feature (iOS8) only impacts UI development if you decide to use margins.
By using margins you can adjust the placement of multiple subviews that share a common relation to a shared superview by changing the value of a single property. This is a clear win over setting all associated constraints with fixed values, because if you need to update all the spacing, instead of changing each value one by one, you can simultaneously modify all relevant placement by updating the superview’s margin with a single line of code like this one:
self.rootView.layoutMargins = UIEdgeInsetsMake(0, 50, 0, 0);
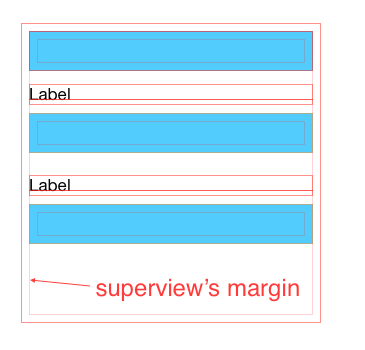
To illustrate this benefit, in the following case all subviews’ left edges are aligned to their superview’s left margin. Thus, changing superview’s left margin will affect all subviews at the same time.